Lookout Mountain Conditions
Learn how to fly at America’s #1 USHPA CERTIFIED Free Flight Resort
Our Conditions
As free flight pilots, we are dependent on the wind and convective currents of the atmosphere to fly high above the earth. Learning to recognize and interpret the meteorological conditions around us is an integral skill for the successful pilot. It can take years to develop the knowledge and awareness necessary to accurately interpret forecasts and the environment around us, but thankfully pilots are absolute weather nerds and if you spend enough time hang waiting on launch, you will start to glean how to determine when the conditions are best for your skill level.
It is important to know when the conditions are good for flying, but even more importantly, it is important to know when conditions are NOT good for flying; better to be on the ground wishing you were in the sky, than in the sky wishing you were on the ground! In the hope of making your life a little easier though, here is a crash course on how to assess conditions for flying and some meteorological warning signs to look out for.

THE TRAINING HILLS
Throughout your training, our instructors will be by your side to ensure that you are only launching in favorable conditions. Wind direction is the first thing you will want to learn how to detect while out on the training hills. We always want to be launching as straight into the wind as possible and we can determine which way that is by looking at our streamers, wind socks, rustling leaves, water ripples or by throwing up a handful of dirt or grass and seeing how it drifts, or even just by holding out our hands and sensing the breeze with our skin. On our Small Hill, we can launch in winds from every direction except the west. Our Big Hill is launchable in breezes from the west to north.
When assessing weather conditions, it is important to remember that every location is its own distinct microclimate and our training hills, set at the base of Cloudland Canyon, are a very unique locale. Just because the weather forecasts say it will be blowing 4 mph from the west at 10 AM, does not mean that that will be so. We are surrounded by the ridges of Lookout Mountain to the east and Sand Mountain to the west. The prevailing winds can swirl around and over these geological obstructions creating different effects on the ground than predicted by even the most advanced forecast algorithms. This is why there is a saying that you can’t fly if you are not setup; oftentimes days that are not forecast to be flyable are, and days that are, are not!
On your first day of ground school, you will want to be launching in calm and smooth conditions; your instructor will make sure you stay on the ground if the winds pick up anywhere beyond 5-6 mph. We start so early in the morning because the first hours of the day are often the most smooth and gentle before the prevailing winds have time to gain strength. Thankfully, because of our training hills being sheltered by the surrounding ridges, it will often be calmer on the hills than up on top of the ridge. Unfortunately, these same sheltering ridges can cause the wind to swirl around the valley and change direction from moment to moment. This is why you will often see our instructors shuffling you from one side of the Small Hill to the other. Every time before you launch, check the streamers and try and sense the breeze on your face. It can take only a moment for a southerly breeze to rotate around to the north east and all of a sudden you are about to launch in a tailwind! Your instructors will be watching out to make sure this doesn’t happen, but you should be starting to develop the awareness to detect these changes for yourself.

Calibrating your wind speed detection is the next step after getting a grip on how to sense the wind’s direction. It is easier to launch in 5 mph of wind than no wind, but at the same time we want to ensure you have developed the control and airspeed awareness to cut through any potential gusts before you launch in windier conditions. If you see the wind streamers start to fly straight backwards, that is about 6-7 mph of wind. This is the upper limit of what we want to be launching into on the training hills. As you progress in your training, you will start to enjoy having a bit of a headwind when launching, but it only takes one good gust knocking you downwind to realize that you need to take that breeze seriously!
By the time you progress to the Big Hill, you will have gotten a grip on flying straight and level through a bit of a headwind. On the Big Hill, you will start working on your turns and become more comfortable launching in slightly stronger winds and start to figure out how to handle minor cross winds. In 0-5 mph of wind, we can launch in up to 45 degree of cross or so. As the winds pick up to 6 or 7 mph or stronger though, you will want to narrow that window to about 15-20 degrees.
To the left of the Big Hill, there is a channel in the trees that can create a Venturi effect, imagine an air funnel channelling the air into a specific path. It may be calm on launch, but when you get out over the field, you may all of a sudden get hit by a breeze blowing in from the south west. This is important to consider when determining which direction you turn. Similar to launching, we always want to land into the wind if we can. Your instructor will help make sure you are consistently turning in the right direction to land into the wind given the day’s conditions, but it is important to start figuring out how your local environment can affect your flight path and plan accordingly.

Sometimes Lookout Mountain can shade the Big Hill from a prevailing easterly wind. While this tailwind is light, the mountain and trees can keep the hill in the lee and allow you to get a good morning’s session in. If the breeze picks up, however, these calm conditions may quickly pick up into a rotor-y tail. Rotor is what we call disorganized air caused by mechanical turbulence. Imagine the rush of churning foam as water flows over rocks; when the air is blown over hills, trees and buildings, it also gets churned into a turbulent wake. These rotor fields can sometimes be very deceiving. The wind blowing over the back of the trees on the Big Hill can actually wrap around over the front of launch and cause the streamers to start lightly blowing in. This may make you think it is a great time to launch, but hold up; take a look at those treetops behind you! If you see the branches swaying and leaves rustling up behind launch, that is a strong indication that there is a prevailing tail wind despite what the streamers are telling you up front.
This is an important consideration to remember throughout your flying career; just because it feels like it is blowing in on launch, that does not mean it ACTUALLY is. The wind can wrap around buildings, mountain tops, cliff faces and trees; creating the appearance of a good launchable cycle when in fact you will by flying straight into a potentially stressful situation. This is why it is important to know the day’s forecast and observe the way the clouds are moving and combine this together with what you feel on the ground to get an educated guess at what is actually happening in the specific environment you find yourself. Throughout your time on the training hills, ask your instructors to explain what is going on with the conditions as the day progresses. We’re all weather nerds so we will be happy to explain!
After wind direction and wind speed, the next most important thing you need to be paying attention to during your time on the training hills is thermal activity. Thermals are packets of warm air rising up through the surrounding atmosphere; imagine water dripping from the roof of a cave and turn that image upside down and replace the water with air. As the sun heats up the earth’s surface, the air on the ground starts to warm and pool in areas that we call thermal collectors. These pockets of warm air will build and build until they gain enough solar energy to “pop off” and are triggered to release and rise up into the atmosphere.

This collection of warm air will continue to rise as a group until it reaches an equilibrium temperature with the surrounding atmosphere. A packet of air will cool at a rate of 4.4 degrees fahrenheit every 1000 feet. Thermals top out when their air molecules have cooled enough to equal the surrounding atmosphere’s prevailing temperature. This equalization temperature, which determines the elevation of “cloudbase,” is called the dew point; the temperature at which the air becomes totally saturated with water vapor. The less humid the air is, and the greater the temperature differential between the day’s low and high, the lower the dew point temperature will be and the higher the elevation cloudbase will be.
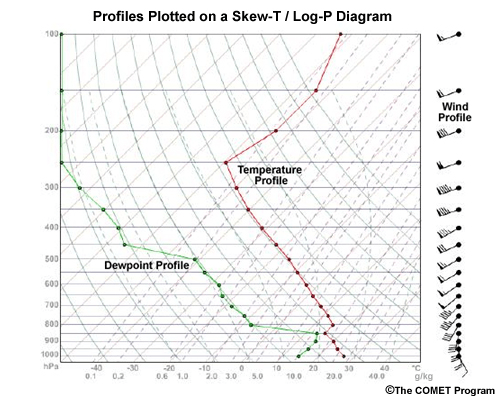
That is a lot of information. We’ll avoid getting into Skew-T charts, dry and adiabatic lapse rates and all that jazz right now, but for the sake of your time on the training hills; what you need to know about thermals is that the drier the ground is, and the more sun it is absorbing, the more likely there are to be thermals popping off. An important thing to remember is that wherever there is lift, there is usually sink right beside it; as the warm air of a thermal rises, cold air from the surrounding atmosphere is sucked down to fill the void.
As it gets later and later in the morning, you may start to notice the streamers laying limp or starting to move for a few moments at a time in contrary directions from the prevailing breeze. This is a good cue that thermals are starting to rise up in the surrounding area; they may be rolling up the hill or popping off way in the field and drawing cool air toward itself. Like an unexpected wind gust, flying through a thermal when you are not expecting it can cause you to get pushed into a turn if you are not flying with enough airspeed and awareness to cut through this convective turbulence. Avoiding such unexpected events while on the Small and Big Hill are why we often end our lessons around 11AM if the sun is shining. Luckily, on overcast days we can often keep flying later into the day, if the wind allows, as the lack of solar radiation will prevent thermals from fully developing.

MOUNTAIN LAUNCHES
Alright, you’ve made it through the training hills and you’re ready to start knocking out your first ten mountain launches! Now is when you need to start paying attention to forecasts and prioritizing your time to be setup and ready on launch for those precious windows of “studentable” air. Like on the training hills, we want your first mountain launches to occur in smooth to light conditions with winds no more than 5-6 mph, with zero thermal activity in the LZ; this means launching early in the morning or in the last hours before sunset. Overcast grey days can be a new student’s best friend as the cloud cover will protect the LZ from solar radiation and allow you to keep getting sled runs in, potentially all day long!
Unlike on the training hills, our window of acceptable wind directions for foot launching off our radial ramp are far more narrow; west to north north west. When trying to figure out when it is worth it to make the trip up top to hang wait and try and get some flights in, it is important to start being able to interpret the day’s forecasts and make accurate assumptions about whether or not the journey up is worth your time.
We recommend students use Wunderground’s 10-day forecasts for Rising Fawn, GA and US Airnet’s Chattanooga, TN 3-day aviation forecast for making basic conditions judgements. Ideally, you are looking for windows in the morning or evening with sub 5 mph predicted wind speeds coming from the west to north. An important thing to consider is that these forecasts are for on the ground wind speeds; our launch is 1340’ above ground level, so typically the wind speeds we experience at that elevation are about 50% stronger than those predicted on the ground.
As you start coming up to launch to set up in the morning as the sun is rising, you will often observe a moderate tailwind even when it is forecasted to be calm or blowing in from the west. This is what we call a katabatic wind. Things go katabatic when denser, cooler air on the top of a mountain is drawn down the face of the ridge by gravity. The cold air on top of the mountain rushes down into the warmer valley creating a descending air mass. This condition will usually stop as soon as the sun starts to warm the mountain top, reducing the air density and equalizing

This transition time can be the best windows to get your first mountain launches in. There is a golden hour for sled runs right in between when the sun has started to warm up the mountain enough to neutralize the katabatic flow but has not had enough time to reach over into the valley and start thermal development. You need to be set up and ready on launch to take advantage of this window while it lasts; if the sun is out, sooner than later those thermals will start making the LZ more and more turbulent.
Contrastingly, in the afternoon and evening, an anabatic wind can overpower a prevailing crosswind and provide for launchable cycles despite an unfavorable forecast. Anabatic winds occur when the valley floor has been warmed up by the sun so much that the temperature differential with the surrounding atmosphere is great enough for the valley’s airmass to rise up the ridge. This on a valley-wide scale is what happens when you hear pilots talking about an evening “glass off” or “wonderwind”. A glass off occurs when the whole valley’s airmass rises up as a single unit, creating smooth joyous lift everywhere you go. A wonderwind is just an anabatic glass off in conjunction with a ridge soarable amount of wind. Anabatic events are hard to predict, but you can generally rely on the fact that on light and variable days, if the sun is out, the valley will warm up and cause warm air to be funneled up the mountain side. This is why if winds are forecast to be under 5 mph or so, it is very often flyable if the sun is out, even if it is predicted to be a light easterly or southerly breeze.
Once again though, remember; the more sunlight, the more likely there are to be thermals, and where there are thermals… there will be sink! It can be very disconcerting to get pushed up ten to twenty feet while in ground effect, it can be even more disconcerting when you get slapped by the “hand of god” and hit a strong patch of sink right as you’re making your turn from base to final. Landing in turbulent air is serious business, don’t seek it out until you have developed the skills and confidence to prepare yourself!
-1920w")
AEROTOW
The beauty of aerotow is that you are not as restricted by wind direction as you are when foot launching. Our Landing Zone runs north to south and we typically fly anytime the wind is under 15 to 20 mph. In light winds, our Dragonflies run in pretty much any wind direction, but as the wind picks up to 12 mph plus, we are often grounded when it blows “over the back” from the east. A strong easterly wind creates a rotor field at the elevation of the ridge, creating a turbulent wave of wake that is not very much fun to tow through. Other than that, if the wind isn’t too strong and there are no storm cells or signs of overdevelopment around, we’ll be towing!
As a student, we will want you to do your aerotows first thing in the morning or in the last hours of the day; our student blocks are at 9AM or 7 or 6PM depending on season. Encountering rotor, lift or sink while on tow can be quite startling, so we want to make sure you are learning how to properly manage your glider in as smooth conditions as possible. As you progress though, you can start doing tows later in the morning and in the afternoon and work on your thermaling skills by getting dropped off right in the lift!

RIDGE SOARING
Most pilots get up and experience sustained flight for the first time by ridge soaring. Ridge soarable conditions are caused by mechanical lift created by wind passing over a large obstruction – like a ridge or mountain – producing a standing wave of air. At LMFP, that obstruction is Lookout Mountain. If the winds are blowing strong enough, we can fly into this standing wave and surf along its currents, gliding up and down the ridge and getting a few hundred to almost a thousand feet up over launch depending on the strength of the wind. In a hang glider, this takes about 10-12 mph of wind or more. In a paraglider maybe 7 or 8.
The first step in determining if conditions are ridge soarable, is to recognize which way the wind needs to be blowing in order for your ridge to be “on”. At Lookout, the ridge is soarable in west to north north west winds. On windy days from the south west, conditions may seem temptingly soarable, but the air on south west days is often very “trashy” due to it getting torn up and disorganized from blowing over the westerly foothills and Sand Mountain.
Before launching, we always want to have a clear image in our minds of how the winds are predicted to change over the course of the day. Take these forecasts into account when determining your flight plan. Always try to fly upwind from your LZ in the initial stages of your flight so that you know you can have an easy downwind drift back home. Know before you launch whether things are going to pick up or taper off as the day progresses and whether the wind direction is supposed to change at all as evening approaches. There’s nothing worse than finding yourself progressively lower and lower fighting an unexpectedly strong headwind desperately trying to get back to your LZ.

When learning to ridge soar, you will want to get experience launching and landing in stronger and stronger conditions before actually trying to get up. Launch in 5, 7, 10 mph and start experiencing how to use a wire crew and land in a moderate headwind. Once you have done this enough times to feel confident, practice launching and turning in the lift band in moderate conditions. The lift band is the width of air that is driven upwards by the ridge. It usually extends about 50 to 200 ft out from the edge of the ridge, depending on the strength of the wind. The stronger the wind, the wider the lift band. In order to ridge soar, you need to fly back and forth in this lift band, managing your airspeed in order to fly fast enough to maintain control while flying slow enough to maximize your efficiency and get up. Ridge soaring in marginal conditions (10-12 mph) can be very risky because you have to fly closer and closer to minimum sink in order to get up in lighter and lighter conditions, leaving you very little reserve of speed in order to maintain control if you encounter turbulent air.
After you have worked your way up to launching and flying straight out and landing in 10-12 mph of wind, put it all together and launch in 15 -18 mph of steady air and turn in the lift band and fly slow enough to get up but fast enough to retain enough airspeed to avoid the trees! Be on extra high alert until you are hundreds of feet above the ridge. Remember; always turn away from the ridge when reversing directions! The pilot with the ridge to their right has the right of way. However, don’t expect that just because you have the right of way that the other pilot is going to do the right thing. You need to have your head on a swivel when soaring as there may be 20 or 30 other gliders up in the air with you and you can’t always assume everyone is on their A-game. If a collision seems imminent, turn out toward the valley. An extra half hour of flying is not worth any kind of close call.
If you are close to the trees, you do not want to be flying slow. As you are first starting to soar, it is far safer to try and get up in a steady 15-20 mph of wind than 10-15 mph. Be aware, however, that there is a big difference between 18 mph of wind with a 3 mph gust factor, and 15 mph of wind with a 10 mph gust factor. The gust factor is how much stronger potential gusts will be. Strong gusty days may guarantee you getting up, but once you are there, it may be a terrifying rodeo ride you wish you didn’t have to endure. Once again, better to be on the ground, wishing you were in the sky, than in the sky wishing you were on the ground! Windy is a great resource for gust factor forecasts and has a more refined view than Wunderground or USAirnet. It shows in detail how the winds are expected to vary based on geography and elevation. You can pick which models you want to observe, your desired elevations and it also has great radar and satellite imagery views.

Typically post-frontal north west days are the best conditions to ridge soar at Lookout. The air that comes after a front is often smooth and consistent. Prefrontal air can be rather disorganized and turbulent; it can be soarable, but you may feel like you are flying through an active washer machine on a prefrontal day. On stronger days, the last hour or two of daylight typically offers the best soaring window. Launch too early and you may get worn out and have to face landing in a turbulent LZ. Wait it out and you might be rewarded with an evening wonder wind and experience super smooth lift across the entire valley.
On strong north north west days, the north end of our landing zone can become a bit hazardous due to rotor blowing over the surrounding foothills. If it is coming in strong form the north, treat the landing zone north of the clubhouse as off limits and keep your approach to the southern half of the field. On any windy day, you will want to be aware of wind gradients as you descend below the ridge and tree level. You may be flying into a 15 mph head wind, only to get below the trees and find the air practically calm. This is one of the reasons why you always want to have a reserve of speed throughout your approach; if you don’t, you might just find your wing without enough airspeed to maintain flight.
One thing you never want to do when ridge soaring is get trapped back behind the ridge. If you fly too far behind the ridge, you will have to fight that head wind to get back into the valley. Say you are flying a Falcon and the wind is blowing a consistent 25 mph. You’re Falcon can maybe hit 30 mph without going into a dive. If you get swept back too far, you will have to fly straight into the wind, and even at full speed you will only be progressing 5 mph over the ground. Depending how high you are, that might not get you home with enough elevation to clear the tree line. We call this your glider’s penetration. The faster your glider can fly in level flight, the more penetration you have. Beginner gliders do not have great penetration so be very cautious when thinking about flying a long ways downwind, you may have to fight your way back! Be aware, as well, that down low behind the ridge there will be a wake of rotor created from the wind blowing over the top of the mountain. This wash of turbulent air has sent numerous pilots down into the trees. Don’t get trapped behind the ridge, don’t play low on the ridge, and if you find yourself scratching along the trees, turn back into the valley and save yourself to fly another day!

THERMALING
If you really want to get up, up and away, you will need to learn how to thermal. Thermaling is the holy grail of soaring free flight as it can be a tricky process to dial in. First, there needs to be the right conditions for warm packets of air to rise up through the atmosphere. Second, you need to figure out where in the world these bubbles of lift are actually located. Finally, you then need to actually get your glider flying through these rising air currents and keep circling about within their drifting core to keep going up.
So, when do thermals occur? The simplest answer, is when the sun is shining! Thermals are what we call convective lift; they are formed by collections of warm air rising up through the atmosphere as a unit. Without sunlight, there is not enough heat generated on the surface of the earth to create a strong enough temperature differential with the surrounding atmosphere to generate lift.
The first ingredient for strong, tall thermals, is direct sunlight. The second ingredient is low humidity and a dry ground. It can be bright and sunny, but if the ground is sopping wet, it will take a whole lot more energy to warm that damp earth up than it would if it were dry and crispy. The drier the conditions have been, the stronger your thermals will be. Finally, you need temperature differential. Desert sights like the Owens Valley are known to have tear-your-face-off thermals that will rise up at 2,000 feet per minute or more and keep on roaring through the atmosphere well past 18,000 feet. This is due to there being such a huge temperature swing between the night’s lows and the afternoon’s highs. The bigger the temperature differential between the surrounding atmosphere and that sun-charged packet of air, the taller and faster those thermals will rise!
Thermals will start popping off any day the sun is shining. Whether or not they stay intact enough to get you to cloudbase depends on how windy it is. Strong winds can tear up thermals and cause them to wimper out well below their maximum potential elevation. This is why light and variable, low wind days are the favorite for thermal hunters. If you see the forecast calling for a lot of sun, not too much cloud cover and the wind drifting this way and that with the velocity under 5 mph or so, you are looking at an ideal thermaling day. Throw in a 20 to 30 or even 40 degree temperature swing between the day’s high and low, and you may be able to go way up!
Windy days can cause your thermals to drift down wind. Imagine the smoke being driven up and out by a barreling fright train; it plumes up and then drifts backwards leaving a wake of vapor. This is how strong thermals act on windy days. If the thermal core is strong enough, it will shoot up through the wind, but eventually it will lose vertical momentum and start drifting downwind. Thermally active ridge soarable days can be real rodeo rides because you have both horizontal mechanical turbulence and vertical convective turbulence to deal with as well. Combine those two together on your final approach and you will be dancing to left and right trying to keep your wings level; not for the faint of heart!
Spring time brings the strongest “active” air and the tallest thermals. The prevailing atmosphere is still relatively cool from the winter season but the sun is strong enough to really warm things up, creating big temperature swings. Throw in a few days without rain and you can get seven, eight, nine thousand feet above the ground! The fall also brings strong thermals, but their elevation and rate typically don’t reach quite as high as in the spring because the atmosphere has been cooked day after day since the summer and there are less drastic temperature swings. The summer consistently brings in more “stable” air. Because there is less temperature differential midsummer, thermals usually don’t go as high.
This doesn’t mean that summer thermals are not strong. Midday summer conditions can cause the landing zone to be a boiling cauldron of rising and sinking air. The bubbles just don’t rise very high and equalize more quickly. Additionally, the risk of overdevelopment is a constant thing to look out for during summer flights. You want to keep a close eye on all the clouds around you and pay attention if they are starting to grow real tall and darken up. As these clouds build and build they can grow into massive thunderheads, unleashing lightening and rain which can send out terrifying gust fronts.
A gust front is a wave of wind created by the displacement of falling rain. Things may be calm as can be, but in minutes a rainstorm 30 miles away can send a wall of wind rushing towards you. Getting caught in a gust front while in the air can be a terrifying thing and the conditions that create it can change in mere minutes. In the summer, if you see any radar activity within about a 50 mile radius, you’d be wise to stay on the ground. Look out for virga as well; they are the misty indication of rain falling from upper elevation clouds that evaporates before it hits the ground. Virga can also send out gust fronts and are an important warning sign to watch out for.
Summertime flying can be very rewarding, the thermals are often smoother and lighter so getting up takes work, but once you are up, you want to constantly keep your eyes peeled for impending warning signs. If those clouds are growing taller and taller, or joining together into one massive horizontal monster that is only getting darker and darker, it is likely a good time to head for the ground. Always keep an eye on other pilots. Who’s flying? Why are they going over there? Why am I suddenly the only glider in the sky? When there is the possibility of overdevelopment, you need to be constantly on guard and ready to get down, fast!
Typically, the higher and drier the ground, the stronger the thermals you will find. This is why you will often get up higher flying in thermals developing off the top of the mountain than those in the valley. As a beginner though, you don’t want to encounter strong thermals. You want to avoid them! Until you have developed the confidence necessary to land safely in a rowdy LZ, you want to use thermal activity as a sign to go have lunch and wait for the afternoon to cool off. As you progress, though, you will start trying to figure out how thermal collectors, wicks and triggers function and start looking out for birds circling or leaves rustling as signs of potential lift.
When on launch, start paying attention to how the cycles vary. If all of a sudden the wind picks up 5-10 mph and starts blowing straight up the ramp, that is a cue a thermal is likely rolling up the mountain face. Take a look at the sky when this happens and you may see a cloud drifting over you right behind launch. If there is enough moisture in the air, thermals top out and form into cumulous clouds. These can be a great cue of where to find thermals. The trick is to find the newly developing wispy clouds rather than the already mature cotton puff fully developed clouds. If the cloud is already big and puffy, the thermal has likely petered out and your potential lift is on the decline, if not entirely gone. The goal is to get into that column of rising air as it starts to feed its newborn cloud. Spotting clouds developing is an art form, but spend enough time on launch and you’ll start to pick it up!
FURTHER LEARNING
If you want to get deep on your conditions analysis, here are some great resources for further learning.
MetEd SkewT Mastery Course – a free comprehensive break down of how to understand and interpret SkewT soundings which are our most useful tool in predicting lift characteristics.
USHPA Thermaling Articles – learn all about thermal wicks, collectors and triggers!
XCSkies – a paid service that is well worth the small monthly rate. Get the most detailed weather reports available tailored to the soaring pilot.